


How to Access the List of Styles Through the User Interface
The subscribers (and just the viewers) of the "Scripts for Adobe InDesign" channel probably didn’t miss the release of a series of videos on the topic stated in the title of this article. Here, in the article itself, the code from the video is provided with links to those videos, in which you can find the explanation for this code.
Here, it should only be noted that the main feature of the algorithm is its versatility. With the help of the algorithm, you can easily and quickly get a list of styles of any type — the paragraph, character, table, or object styles. It is sufficient to replace the word "paragraph" in the second line of the first code fragment with the required type: "character", "table", "cell", "object", and the script will create a complete list of styles of the specified type (including the style groups) for the user window.
But how does one change the code so that the user himself chooses the type of styles he needs? A link to the corresponding video can be found at the end of the article.
Script 1. User interface for choosing styles
You can find details on the algorithm in the video:
"30. ScriptUI. Part 4. The scrollbar as a tool for controlling the window size".
#include "getStylesList.jsx"
var stylesType = "paragraph";
var sNames = getStylesList(stylesType);
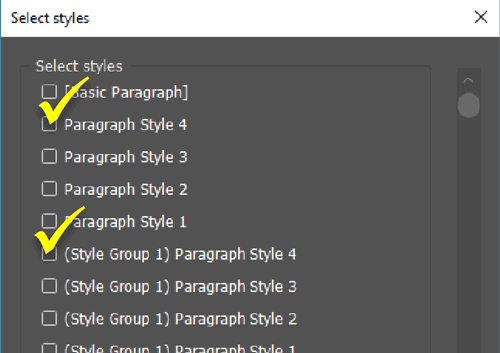
var w = new Window('dialog', 'Select styles');
w.alignChildren = 'left';
w.orientation = 'column';
w.maximumSize.width = 500;
w.maximumSize.height = 460;
var maingroup = w.add('group');
var pan = maingroup.add('panel', undefined, 'Select styles');
pan.alignChildren = 'left';
var cBox = [];
for (i = 0; i < sNames.length; i++){
cBox[i] = pan.add('checkbox', undefined, sNames[i]);
cBox[i].helpTip = sNames[i];
}
var sb = maingroup.add('scrollbar{stepdelta: 26, jumpdelta: 78}');
sb.onChanging = function(){
for (p = 0; p < cBox.length; p++){
cBox[p].location.y = -1 * this.value + 26 * p + 13;
}
}
var butgroup = w.add('group');
butgroup.add('button', undefined, 'OK');
butgroup.add('button', undefined, 'Cancel');
w.onShow = function(){
maingroup.size.height = w.size.height - 78;
maingroup.size.width = w.size.width - 20;
pan.size.height = maingroup.size.height;
pan.size.width = maingroup.size.width - 50;
sb.size.height = maingroup.size.height - 13;
sb.size.width = 20;
sb.location = [maingroup.size.width - 30, 10];
sb.maxvalue = cBox.length * 26 - pan.size.height + 26;
butgroup.size.width = w.size.width - 20;
butgroup.location = [20, w.size.height - 50];
}
if (w.show() != 1) exit();
Script 2. Creating a list of styles for a custom window
The function for creating a complete list of styles. It should be placed in a separate script called "getStylesList.jsx" and saved in the same folder with the first script. Then the first script can access it (see line 1 of the top script). A detailed description of the algorithm can be found in the video:
"31. ScriptUI. Part 5(1). How to code «I don’t know what»"
"32. ScriptUI. Part 5(2). How to obtain a list of styles of any type in one functionality".
function getStylesList(stylesType){
    var doc = app.activeDocument;
    var curStyleName = stylesType + "Styles";
    var curStyleGroupName = stylesType + "StyleGroups";
    var curScript = "var curStyles = doc." + curStyleName + ";\n";
    curScript += "var curStyleGroups = doc." + curStyleGroupName + ";\n";
    app.doScript(curScript);
    var styleList = [];
    for (var i = 1; i < curStyles.length; i++){
        styleList.push(curStyles[i].name);
        }
    for (var i = 0; i < curStyleGroups.length; i++){
        curScript = "var curStylesInGroup = curStyleGroups[i]." + curStyleName + ";";
        app.doScript(curScript);
        for (var j = 0; j < curStylesInGroup.length; j++){
            styleList.push("(" + curStyleGroups[i].name + ") "+curStylesInGroup[j].name);
            }
        }
    return styleList;
    }
Processing the selected styles
After the user has launched the script and selected the styles he needs, these styles must be collected into one array and transferred to the main functionality, in which they will be processed.
Let’s collect the styles selected by the user into a separate array through a separate function. The line below should be placed in the first script at the end:
var myStyles = getSelectedStyles(cBox, stylesType);
myStyles is an array variable that will contain the selected styles. We will form this array in the getSelectedStyles function. To do this, let’s pass the necessary data into it — an array of checkboxes "cBox" and a type of styles ("stylesType" variable). The function must be created and placed in the second script — "getStylesList.jsx".
For other explanations, see the video:
"33. ScriptUI. Part 5(3). Processing the selected styles".
function getSelectedStyles(cBox, stylesType){
    var selStyles = [];
    for (var i = 0; i < cBox.length; i++){
        if (cBox[i].value){
            var nm = cBox[i].text.split(") ");
            if (nm.length == 1){
                var s = "selStyles.push(app.activeDocument." + stylesType + "Styles.itemByName(nm[0]));";
                }
            else{
                nm[0] = nm[0].substring(1);
                var s = "selStyles.push(app.activeDocument." + stylesType + "StyleGroups.itemByName(nm[0])." + stylesType + "Styles.itemByName(nm[1]));";
                }
            app.doScript(s);
            }
        }
    return selStyles;
    }
Working with selected styles in the main functionality
After we have obtained an array of objects, the selected styles, that is, we can send this array to the main functionality of the program. In the first script, add the line at the end:
main(myStyles, stylesType);
As an example, let’s create and display a report, which will show the styles selected by the user from the list. We will create the function for this in the first script as well:
function main(myStyles, stylesType){
    var report = "Styles selected:\n";
    for (var i = 0; i < myStyles.length; i++){
        report += myStyles[i].name;
        if (myStyles[i].parent.constructor.name.match("StyleGroup")){
            report += " (" + myStyles[i].parent.name + ")\n";
            }
        else{
            report += "\n";
            }
        }
    alert(report);
    }
Conclusion
The final video, among other things, provides an example of how you can give the user the opportunity to choose not only the styles of the proposed type (paragraph, character styles, etc.), but also preliminarily choose the type of styles, with which he wants to work. Link to the video:
I wish you comfortable work with your custom windows.
If the proposed material turned out
to be useful for you, you can
thank the author at this link.

No comments.
Other articles:
- Quick formatting
- Quick Spread Rotate
- Cross-Reference — in Two Clicks
- Access to the script from the localized menu
- Export From InDesign to HTML: How to Tag Character Styles
- Export From InDesign to HTML-2: How to Tag Paragraphs
- Export From InDesign to HTML-3: Tables
- The Script Did Not Appear In the Menu, or One More Time About the Localization
- Export From InDesign to HTML-4: What to Do With Images and Hyperlinks
- Localized Menu: the Adventure Continues

