


Export From InDesign to HTML: How to Tag Character Styles
InDesign allows you to retain local text formatting when exporting to html, due to the fact that you can set the necessary html tags and classes in the style parameters (both paragraph and character styles).
With the paragraph styles, everything is more or less simple: there are six standard tags for headings (<h1> — <h6>), and one for the main text (<p>). If the paragraph requires specific formatting, you can specify the appropriate CSS class in the style parameters. In general, there is nothing interesting: just specify the tag and class in the style parameters, format the CSS, and get the result.
Much more interesting is the case with local formatting, which the text gets through character styles. HTML designers are aware that for each of the main types of formatting there is a different tag in html (and for some types, these is more than one):
- bold: <b>, <strong>;
- italic: <i>, <em>;
- underline: <u>;
- superscript: <sup>;
- subscript: <sub>.
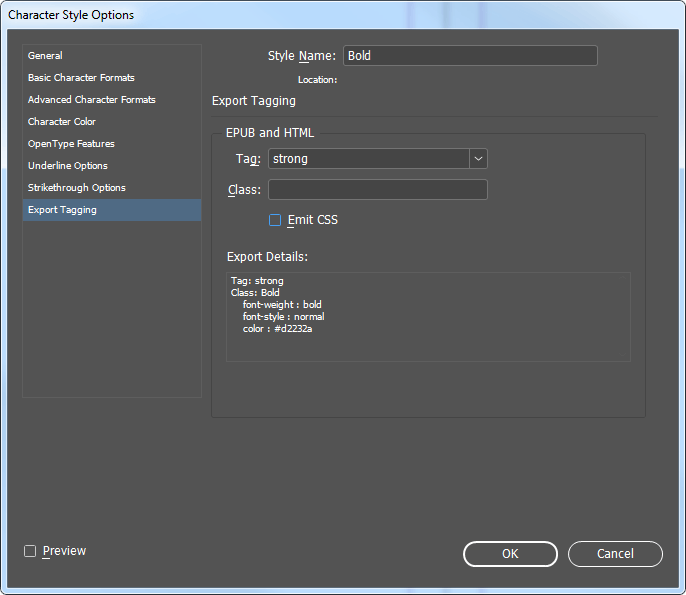
You can find out about the difference in similar formatting tags and the correctness of their use in html markup on specialized sites. The right to decide which tags to use, and instead of which to use CSS styles (for example, <span class = "Bold">), does not always belong to the coder, who often only needs to provide the content strictly in the form and with the markup, with which this site is configured.
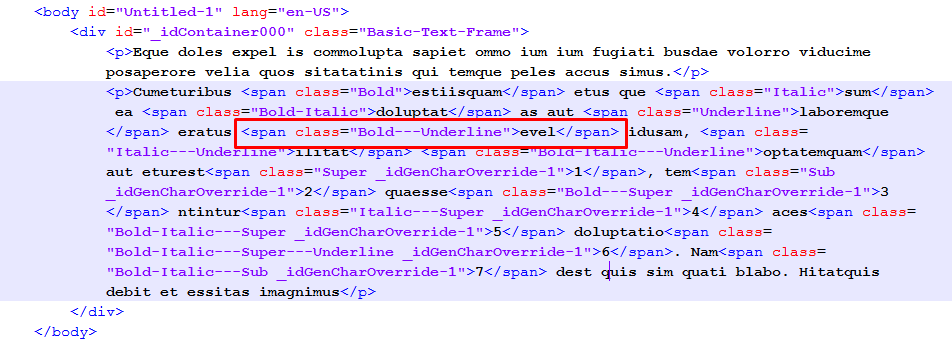
Problems, in this case, arise when the text in InDesign has "mixed" formatting (Bold Italic, Italic Underline, Bold Italic Superscript, etc.), and, in html, it is required to export it wrapped in tags: <strong><i> </i></strong>, <i><u> </u></i>, etc. Through the standard export procedure, we can only get classes from the program:
There can be two solutions here. First: in some html-editor, prepare a series of auto-replacements, with the help of which you process the html-files received from InDesign one-by-one each time, simultaneously clearing them from different "garbage", such as <div class = "x- -------------- "> and so forth.
The second solution is to write a script.
In this case, we will need the script "Preptext.jsx" (by Theunis DeJong, aka "Jongware") as an auxiliary software. It searches for local formatting in the selected story, creates corresponding character styles (if they are not created) and applies them to the text.
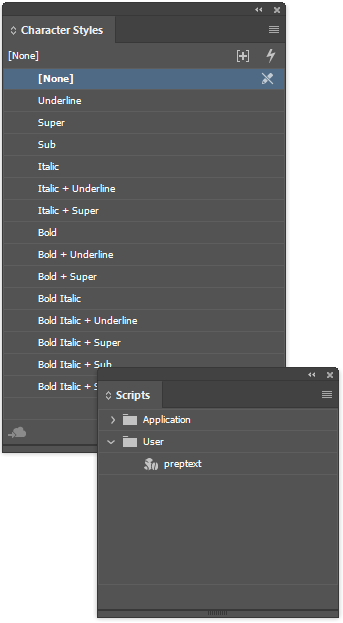
As we can see, styles get names according to a certain algorithm. And the presence of an algorithm is always a good opportunity to automate something.
First we turn to the story in which the cursor is positioned, and get ranges of text styles (that is, sections that differ in format from neighboring sections):
var doc = app.activeDocument;
var sel = doc.selection[0].parentStory.textStyleRanges;
Now, we will create an array of correspondences of the basic formatting types in InDesign to the basic html-tags, focusing on the names of the character styles created by the "preptext.jsx" script:
var arr = [];
arr ["Bold"] = "strong";
arr ["Italic"] = "i";
arr ["Underline"] = "u";
arr ["Super"] = "sup";
arr ["Sub"] = "sub";
Now, we will open a cycle, in which we will sort through the style ranges of the text we have obtained. Since we have to change the content of the story, we will start the cycle from the end:
for (i = sel.length-1; i >= 0; i--){
Check whether any character style is applied to the current text section:
if (sel[i].appliedCharacterStyle.index != 0){
If it is, take its name and extract all words from it, separated by spaces:
	var t = sel[i].appliedCharacterStyle.name.split(" ");
	/*
	For example, if the name of style is "Bold Italic + Underline",
	than array t gets content: ["Bold", "Italic", "+", "Underline"]
	*/
Now, let’s take all the elements of the array one by one, add the corresponding html tags to the each section of the text, and close the brackets of the condition and the loop:
	for (j = 0; j < t.length; j++){
		if (t[j]!="+"){ // Cut the unnecessary us "plus" (no need to process it)
			try{
				sel[i].contents = "<" + arr[t[j]] + ">" + sel[i].contents + "</" + arr[t[j]] + ">";
				}
			catch(e){
				}
			}
		}
	}
}
Complete code:
var doc = app.activeDocument;
var sel = doc.selection[0].parentStory.textStyleRanges;
var arr = [];
arr ["Bold"] = "strong";
arr ["Italic"] = "i";
arr ["Underline"] = "u";
arr ["Super"] = "sup";
arr ["Sub"] = "sub";


for (i = sel.length-1; i >= 0; i--){
	if (sel[i].appliedCharacterStyle.index != 0){
		var t = sel[i].appliedCharacterStyle.name.split(" ");
		for (j = 0; j < t.length; j++){
			if (t[j]!="+"){
				try{
					sel[i].contents = "<" + arr[t[j]] + ">" + sel[i].contents + "</" + arr[t[j]] + ">";
					}
				catch(e){
					}
				}
			}
		}
	}
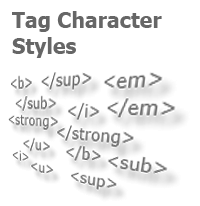
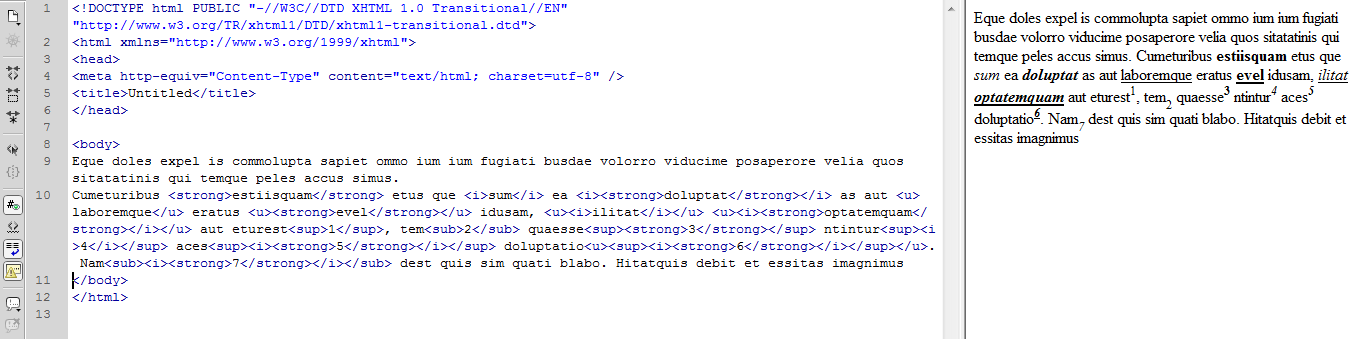
As a result of applying the script to the selected story, we get the following content:
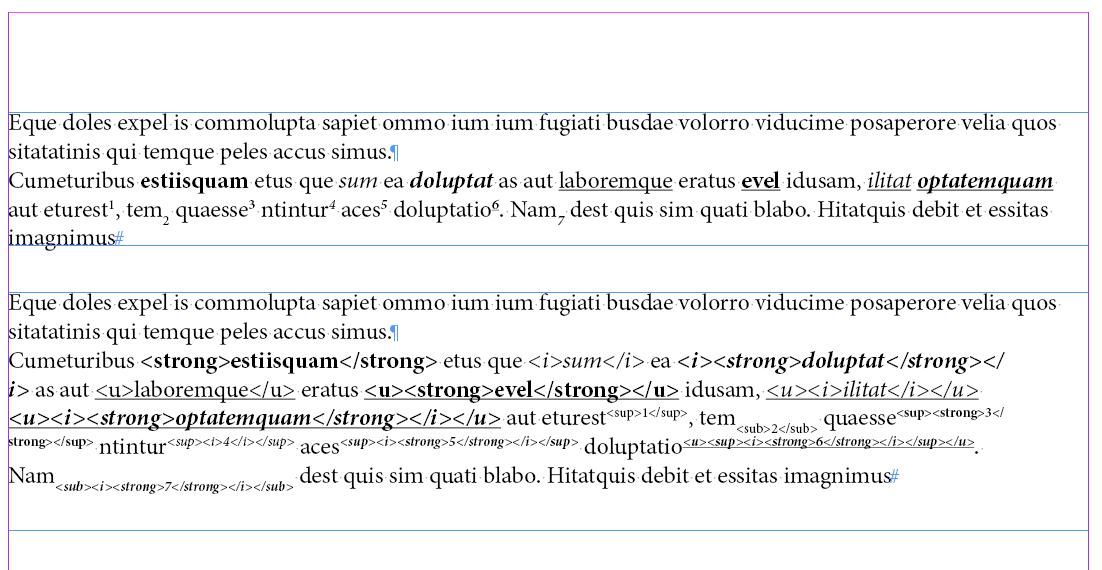
Now it can be copied and pasted into the html-code blank:
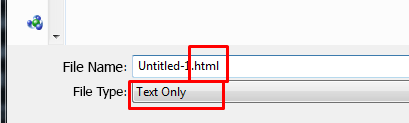
And you can, for example, export, but not directly to html (because in this case all tag brackets, all quotes and ampersands will be converted to special html characters), but as plain text, manually specifying the html file type, however:

REMEMBER that the script should be tested on a copy of a story, and it is advisable to save the publication beforehand so that, in case of unsatisfactory results, you could restore the original data by selecting the Restore command from the File menu.
In the next article, we will teach the script to arrange paragraph tags with classes as well, and also "attach" an html-header with a footer to the text, and get a full-featured html-file, absolutely "clean", containing only the markup we need.
No comments.
Other articles:
- Quick formatting
- Quick Spread Rotate
- Cross-Reference — in Two Clicks
- Access to the script from the localized menu
- Export From InDesign to HTML-2: How to Tag Paragraphs
- Export From InDesign to HTML-3: Tables
- The Script Did Not Appear In the Menu, or One More Time About the Localization
- Export From InDesign to HTML-4: What to Do With Images and Hyperlinks
- Localized Menu: the Adventure Continues
- How to Access the List of Styles Through the User Interface

