


Exact Table Alignment
The script is a tool that expands the capabilities of formatting of table cells compared to the manual formatting. It allows you to specify the cell values, such as the insets, the width and the height, with increased accuracy. In addition, the changes are applied to each cell individually, relative to its original values. It is also possible to set the width of the columns for several tables the same.
Installation
Place the script in the "Startup Scripts" folder and restart InDesign. A menu item will be added to the "Table" menu and the context menu of the tables, which will call on the script window. If this does not happen after you restart the program, correct the script code yourself, as described in the article "The Acript Did Not Appear In the Menu, or One More Time About the Localization". If the problem persists, please use feedback.

If the script is not needed in the main menu, find and change the code lines that are marked with comments (it’s not difficult), and copy the script into the main folder that contains the scripts.
If the script does not appear in the menu...>>
Description
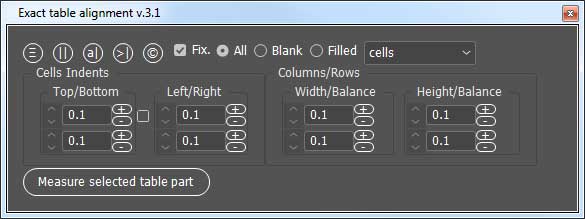
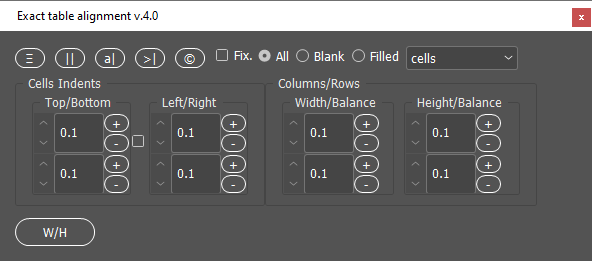
The numbers in the script boxes are the increments, by which you need to change the values of certain parameters of the selected cells.
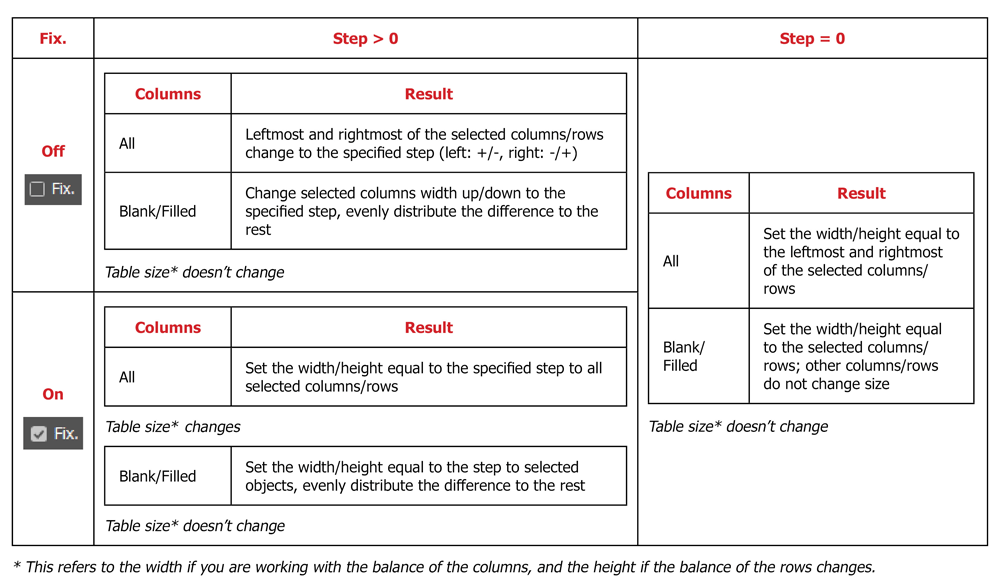
"Balance" does the same, as if you dragged an inside row or column edge while holding down the Shift button. That is, the edge moves within the selected two columns, while their total width does not change. If more than two columns are selected, the width of the leftmost (+/–) and rightmost (-/+) columns in the selected area will change. You may also set the equal width for the leftmost and rightmost columns in the selected area (or equal height for rows). To do this, just set the increment to 0 (zero) and press any of the execution buttons (up/down).
It is possible to measure the selected area of a table (the number of rows and columns, their total height and width).
More features:
 |
auto vertical fit of the text frame content to its bottom edge by changing the height of the selected cells; |
 |
alignment of columns of several tables; |
 |
fit the columns' widths to the text widths in these columns (let's call it "Fit Cell to Content"). |
The script does not block the work with the document, i.e. it is not necessary to close it after completion.
Update to the version 2.2 from 07.06.2016
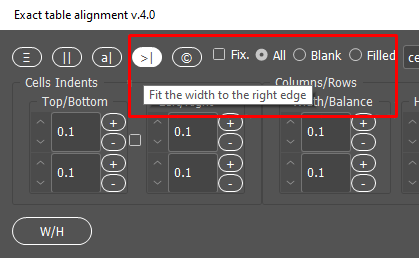
The new features are added, which allow you to precisely fit the table width relative to the nearest-to-the-right text frame column by changing the width of one or several columns of the table.
To perform such a fit, you should place the cursor in any cell from the selected column, or select the cells of several columns whose width will be changed, and then press the new button:

Update to the version 3 from February 2017
In the new version, the functionality of all basic operations has been significantly expanded due to two important innovations.
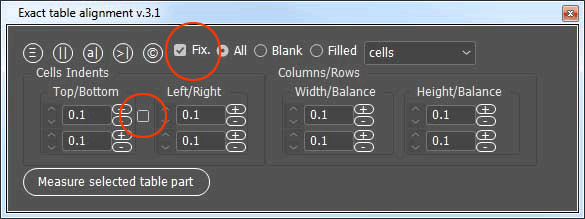
First innovation: now you can assign fixed parameter values to selected cells — both cell inset spacing and width/height.
For the cell inset spacing, an option has been added that allows setting and simultaneously changing the same increment value in one click.
If this option is enabled, when you change the value of any increment for cell insets, other boxes will receive the same value. When you apply this to the selected cells, the values of all insets will change by the specified amount.
If, in addition, the new option "Fixed" is enabled, then the cell insets will get fixed values specified in the respective boxes.
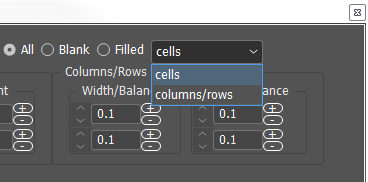
Second innovation: the ability to work separately with empty cells and separately with cells containing text.
At the same time, you can choose which empty/non-empty objects — cells or columns/rows — will be affected at this moment.
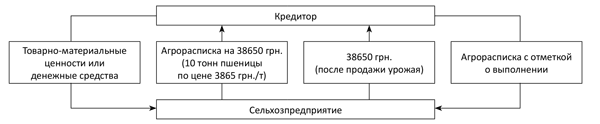
These two new options make it much easier and faster to get the desired result when the table is used, for example, as a tool for creating flow-charts:

Balance
The main difference between working with balance and working with column width (or row height) is that, when you change the cell size with the balance, the total size of the table does not change (except for one case, see table below).
The table below shows how the balance now works depending on the options selected.
Balance work result with different parameters
Menu embedding
The algorithm for adding to the menu has been redesigned so that the embedding now takes place regardless of the version and localization of InDesign. Read more about localization in the article "Localized menu: the adventure continues". Read about installing the script above (section "Installation")
Corrections and other improvements
|
Vertical alignment at the bottom of the text frame | Now, before executing, the script checks and warns if the bottom edge of the frame is not aligned with the bottom margin of the page. |
|
Fit column widths to text widths | If a part of the table is outside the frame (in overset), the script does not stop working as before, but works with the available cells, after which a warning is displayed in the script window that some of the cells are in overset. |
 |
Alignment relative to the nearest column edge on the frame | Fixed a bug, due to which the script stopped working and knocked down the units of measurement of the script in the case when the text in the cells of the selected columns was in overset. |
Update to the version 4.0 from 01.04.2021
1. The interface is adapted to correctly display features in the CC versions.
2. The option of the alignment of the table relative to the nearest column edge was fixed. When calculating the table width, the left indent of the paragraph, in which the table is inserted, previously was not taken into account. Now, this parameter is taken into account.
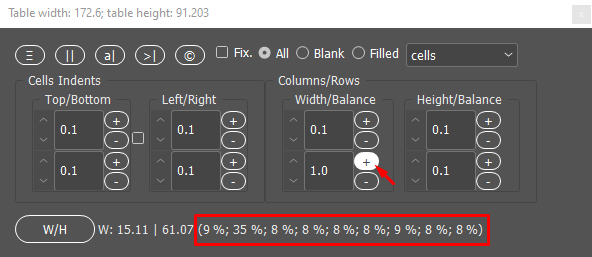
3. Now, when working with the balance, the user can see the information about the width of the columns in percent. This can be useful if, for example, you need to convert a table into the html format, and you want to control this parameter.

You can thank here
Comments: 6
| Олег (03.07.2019 10:52) E-mail |
|
http://skrinshoter.ru/s/030719/2iSZwT56?a Вообще не работает. Версия 14.0.2 х64 |
| Reply |
| Admin (03.07.2019 20:40) E-mail |
|
Олег, вероятно, Вы используете одну из предыдущих версий скрипта. Скачайте, пожалуйста, ещё раз скрипт. Я только что проверил — под этой версией он работает. |
| Reply |
| Admin (12.01.2021 21:40) E-mail |
|
Виха, скрипт надо поместить в папку "startup scripts" и перезапустить InDesign. В меню "Таблица" появится пункт меню "Точное выравнивание". Также, если выделить таблицу (либо её фрагмент) и правой кнопкой вызвать контекстное меню, там также будет этот пункт меню. Если Вы всё это проделали, и ничего не получилось, я смогу с Вами связаться и помочь, например, через Team Viewer или другим удобным для Вас способом. |
| Reply |
| Олег (05.04.2021 10:42) E-mail |
|
Как-то в последней версии размер палитры увеличился... и раньше-то хотелось бы палитру как-то поуже иметь - всё ж тут не самодостаточная палитра а одновременно и таблицу хочется видеть. А когда палитра на пол экрана - обидно. А нельзя ли кнопку Измерить область переместить например в правый угол? Ну то есть чтоб палитра была пусть длинной, но узкой? |
| Reply |
| Admin (05.04.2021 19:55) E-mail |
|
Олег, Вы правы, интерфейс стал крупнее из-за изменённого дизайна пользовательского интерфейса в версиях CC. Я говорю об этом в видео. Вероятно, в следующем обновлении я оставлю всего одно общее поле для изменения шага, а все кнопки напротив этого поля сделаю в один ряд. Думаю, это позволит существенно уменьшить размер окна. Спасибо за комментарий. |
| Reply |
Other scripts:
For Tables
- Common Formatting of Several Tables
- Search-replace the Table Stroke Weight
- Split Table Row by Paragraphs
- Search Table Cell Overflows
For Text
- Merge Repeating Lines of Index
- Table of Contents Correction: Update Page Numbers Only
- Change Numbers In Text
- Split Text By Paragraphs
For Styles
- Change Font Size In Styles
- Compare Styles
- Transliterate style names
- Copy GREP Styles
- Quick Apply Paragraph Style Then Next Style
- Change Language in Styles and in the Text
- Removing Character Styles In the Text (Controlled by User)

